Thursday, 30 August 2018

RHEL/UNIX/Linux/Solaris Interview Questions for Oracle DBAs

RHEL/UNIX/Linux/Solaris Interview Questions for Oracle DBAs


1. What’s the difference between soft link and hard link?
Ans:
A symbolic (soft) linked file and the targeted file can be located on the same or different file system while for a hard link they must be located on the same file system, because they share same inode number and an inode table is unique to a file system, both must be on the same file system.

2. How you will read a file from shell script?

Ans:
while read line
do
echo $line
done < file_name

3. What’s the use of umask?

Ans:
Will decide the default permissions for files.

4. What is the default value of umask?

Ans:
022

5. What is crontab and what are the arguments?

Ans:
The entries have the following elements:
field             allowed values
-----             --------------
minute            0-59
hour                0-23
day of month   1-31
month             1-12
day of week     0-7 (both 0 and 7 are Sunday)
user                 Valid OS user
command         Valid command or script

? ? ? ? ? command

|  | |  | |_________day of the week (0-6, 0=Sunday)
|  | |  |___________month (1-12)
|  | |_____________day of the month (1-31)
|  |_______________hour (0-23)
|_________________minute (0-59)

6. How to find operating system (OS) version?
Ans:
uname –a

7. How to find out the run level of the user?
Ans:
uname –r

8. What is load average ?

Load Average is the value which represents the load on the system for a specific period of time. Also it can be considered the ratio of the number of active tasks to the number of available CPUs.
run queue length - the sum of the number of processes that are currently running plus the number that are waiting (queued) to run.

9. What is top command?
Ans:
top is a operating system command, it will display top processes which are taking high cpu and memory.

10. How to delete 7 days old trace files?

Ans:
find ./trace –name *.trc –mtime +7 –exec rm {} \;

11. How to get 10th line of a file (by using grep)?


12. (In Solaris) how to find out whether it’s 32bit or 64bit?


13. What is paging?


14. What  are huge pages?

15. How to find out the status of last command executed?
Ans:
$?

16. How to find out number of arguments passed to a shell script?

Ans:
$#

17. How to add user in Solaris/Linux?
Ans:
useradd command

18. What does sudo stand for in Linux systems?
Ans:
Abbreviation of sudo is "substitute user do" (some people will abbreviate it as "super user do"), which allows users to run programs with the security privileges of another user, by default the superuser.

Oracle RMAN Incremental Backups


RMAN Incremental Backups (Level 0 & Level 1)


Since taking Full backups consumes lots of space and also takes much time, many dba's resorts to incremental backup. The advantage of incremental backups compare to Full backup is that it takes less time and also consumes less space.
The main idea of incremental backups is that not all tables are changed daily. So why take full backup daily it's sufficient to just take backup of changes rather than whole database.
An Incremental Backup copies only those blocks changed since last incremental or full backup. The incremental backup takes less time and occupies less space then a normal full database backup.
The incremental backups in RMAN is much robust than incremental Export of database using Oracle Export tool. The incremental export of database copies all the tables changed since last complete export. So even if one row in a big table containing millions of rows is changed then the whole table is considered as changed and export tool will export the whole table while taking incremental export.
Whereas if you are taking an incremental backup using RMAN then if one row is changed in a big table then RMAN will copy only the changed block containing the changed row instead of copying the whole table blocks.
So the RMAN incremental backups are much more efficient and also takes less time and occupies less space then incremental export of database
The increment backup in RMAN is done if you specify a LEVEL <n> option, where n can by either 0 or 1
LEVEL 0 incremental backup means complete backup just like Full backup
LEVEL 1 incremental backup copies all blocks changed since last LEVEL 0 or LEVEL 1 backup.
LEVEL 1 COMULATIVE backup copies all blocks changed since last LEVEL 0 backup.
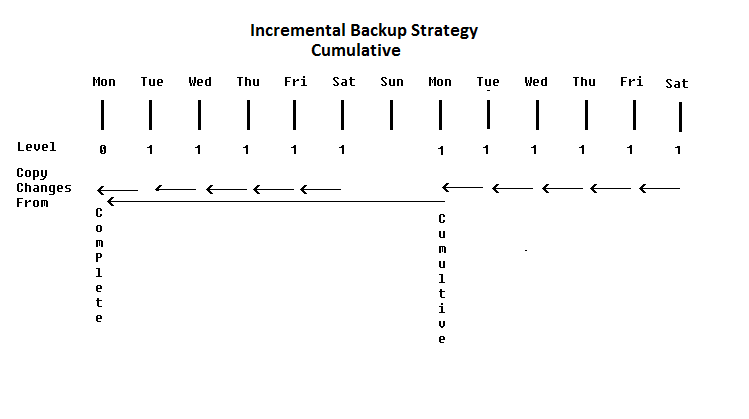
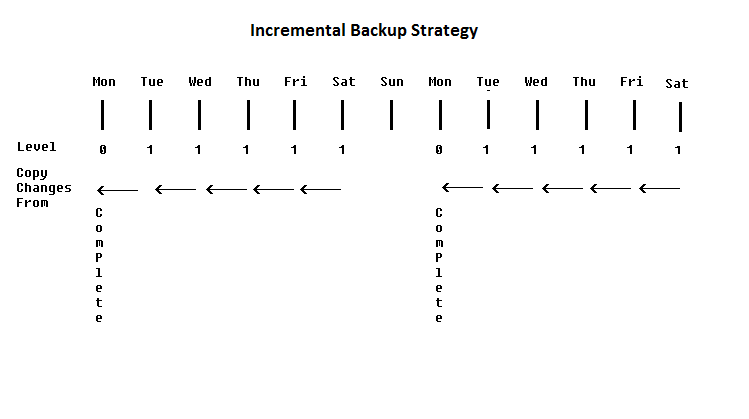
In incremental backup strategy you will first need to take complete backup i.e. LEVEL 0 backup
oracle incremental backups
In the above picture, we are taking complete backup on Monday and then on each other day of the week we are taking incremental backup. If we lose the database on Friday in the first week, the database have to recovered first from complete backup taken on first Monday and then we have to apply the incremental backups taken on Tue, Wed and Thursday.
Similarly if the database is lost on Wednesday in the second week, we have to recover database first from Monday in the second week and then we have to apply incremental backups on Tuesday.

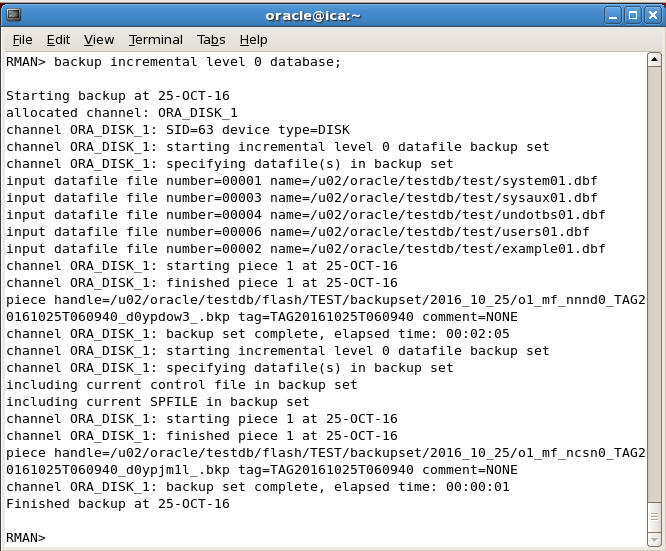
Let's take complete Backup LEVEL 0 backup
Type the following command at RMAN prompt
RMAN> backup incremental level 0 database;
backup incremental complete backup
The above backup can now be considered as base backup or parent backup.
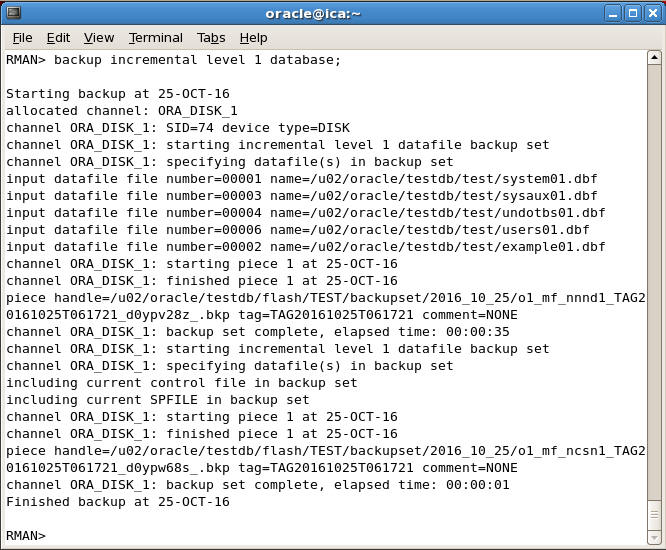
Next day we can take incremental level 1 backup which will copy only the changes made since last backup
To make incremental level 1 backup give the following command
RMAN> backup incremental level 1 database;
incremental level1 backup rman
Similarly you can also take cumulative backup by typing the following command
RMAN> backup incremental level 1 cumulative database;
oracle incremental cumulative backup
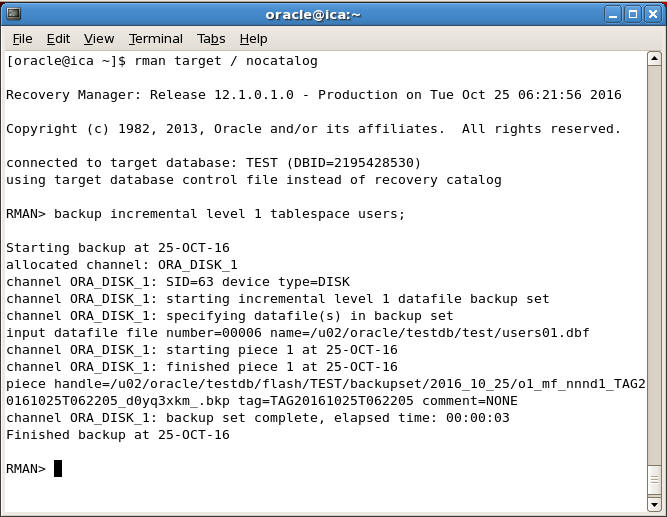
You can also take incremental backup of particular tablespaces.
To take incremental backup of users tablespaces we can give the following command
RMAN> backup incremental level 1 tablespace users;
backup incremental tablespace

Thursday, 9 June 2016

Setup SFTP with no SSH


How to Setup Chroot SFTP in Linux

(Allow Only SFTP, not SSH)


Chroot SFTP Environment
In the following example, john can sftp to the system, and view only the directory that you’ve designated for john to perform sftp (i.e /incoming).
When john tries to perform ‘cd /etc’, it will give an error message. Since SFTP is setup in an chroot environment, john cannot view any other files in the system.
# sftp john@thegeekstuff.com
john@thegeekstuff's password:
sftp> pwd
Remote working directory: /home/john

sftp> ls
sftp> cd /etc
Couldn't canonicalise: No such file or directory
Now that you know what Chroot SFTP environment is, let us see how to set this up.
1. Create a New Group
Create a group called sftpusers. Only users who belong to this group will be automatically restricted to the SFTP chroot environment on this system.
# groupadd sftpusers
2. Create Users (or Modify Existing User)
Let us say you want to create an user guestuser who should be allowed only to perform SFTP in a chroot environment, and should not be allowed to perform SSH.
The following command creates guestuser, assigns this user to sftpusers group, make /incoming as the home directory, set /sbin/nologin as shell (which will not allow the user to ssh and get shell access).
# useradd -g sftpusers -d /incoming -s /sbin/nologin guestuser
# passwd guestuser
Verify that the user got created properly.
# grep guestuser /etc/passwd
guestuser:x:500:500::/incoming:/sbin/nologin
If you want to modify an existing user and make him an sftp user only and put him in the chroot sftp jail, do the following:
# usermod -g sftpusers -d /incoming -s /sbin/nologin john
On a related note, if you have to transfer files from windows to Linux, use any one of the sftp client mentioned in this top 7 sftp client list.
3. Setup sftp-server Subsystem in sshd_config
You should instruct sshd to use the internal-sftp for sftp (instead of the default sftp-server).
Modify the the /etc/ssh/sshd_config file and comment out the following line:
#Subsystem       sftp    /usr/libexec/openssh/sftp-server
Next, add the following line to the /etc/ssh/sshd_config file
Subsystem       sftp    internal-sftp
# grep sftp /etc/ssh/sshd_config
#Subsystem      sftp    /usr/libexec/openssh/sftp-server
Subsystem       sftp    internal-sftp
4. Specify Chroot Directory for a Group
You want to put only certain users (i.e users who belongs to sftpusers group) in the chroot jail environment. Add the following lines at the end of /etc/ssh/sshd_config
# tail /etc/ssh/sshd_config
Match Group sftpusers
        ChrootDirectory /sftp/%u
        ForceCommand internal-sftp
In the above:
§  Match Group sftpusers – This indicates that the following lines will be matched only for users who belong to group sftpusers
§  ChrootDirectory /sftp/%u – This is the path that will be used for chroot after the user is authenticated. %u indicates the user. So, for john, this will be /sftp/john.
§  ForceCommand internal-sftp – This forces the execution of the internal-sftp and ignores any command that are mentioned in the ~/.ssh/rc file.
5. Create sftp Home Directory
Since we’ve specified /sftp as ChrootDirectory above, create this directory (which iw equivalent of your typical /home directory).
# mkdir /sftp
Now, under /sftp, create the individual directories for the users who are part of the sftpusers group. i.e the users who will be allowed only to perform sftp and will be in chroot environment.
# mkdir /sftp/guestuser
So, /sftp/guestuser is equivalent to / for the guestuser. When guestuser sftp to the system, and performs “cd /”, they’ll be seeing only the content of the directories under “/sftp/guestuser” (and not the real / of the system). This is the power of the chroot.
So, under this directory /sftp/guestuser, create any subdirectory that you like user to see. For example, create a incoming directory where users can sftp their files.
# mkdir /sftp/guestuser/incoming
6. Setup Appropriate Permission
For chroot to work properly, you need to make sure appropriate permissions are setup properly on the directory you just created above.
Set the owenership to the user, and group to the sftpusers group as shown below.
# chown guestuser:sftpusers /sftp/guestuser/incoming
The permission will look like the following for the incoming directory.
# ls -ld /sftp/guestuser/incoming
drwxr-xr-x 2 guestuser sftpusers 4096 Dec 28 23:49 /sftp/guestuser/incoming
The permission will look like the following for the /sftp/guestuser directory
# ls -ld /sftp/guestuser
drwxr-xr-x 3 root root 4096 Dec 28 23:49 /sftp/guestuser

# ls -ld /sftp
drwxr-xr-x 3 root root 4096 Dec 28 23:49 /sftp
7. Restart sshd and Test Chroot SFTP
Restart sshd:
# service sshd restart
Test chroot sftp environment. As you see below, when gusetuser does sftp, and does “cd /”, they’ll only see incoming directory.
# sftp guestuser@thegeekstuff.com
guestuser@thegeekstuff's password:

sftp> pwd
Remote working directory: /incoming

sftp> cd /
sftp> ls
incoming
When guestuser transfers any files to the /incoming directory from the sftp, they’ll be really located under /sftp/guestuser/incoming directory on the system.

Wednesday, 1 June 2016

Change the bonding mode in Linux


How to change the bonding mode without rebooting the system?

Resolution

In Red Hat Enterprise Linux 5 or 6, the bonding mode can be changed like this:
Here is an example about how to change bonding mode from 0 to 1 in RHEL5 or 6:

1. Find current bonding mode:
#cd /sys/class/net/bond0/bonding
#cat mode
 balance-rr   0              
The current bonding mode is round-robin.

2. Change the bonding mode:
#ifdown bond0
#echo 1 >mode
#cat mode
active-backup 1
Now the bonding mode has been changed to active-backup.

3. Up the bond0 again:
#ifup bond0

4. Check if the bonding mode has been changed:
#cat /proc/net/bonding/bond0

In Red Hat Enterprise Linux 4, the bonding mode can be changed like this:

Here is an example about how to change bonding mode from 0 to 1 in RHEL4:
1. Find current bonding mode:
# cat /proc/net/bonding/bond0
...
Bonding mode: round-robin
The  current bonding mode is round-robin.

2. Down all bonding information and change the bonding mode:
# ifdown bond0
(down other bonding interfaces if you have)
# rmmod bonding
- Edit /etc/modprobe.conf to change the bonding options (the line should look like the following)
options bonding mode=0 miimon=100
- This can be changed to:
options bonding mode=1 miimon=100

3. Up the bond0 (and other bonding interface) again. The bonding module will be reloaded automatically:
# ifup bond0

4. Check if the bonding mode has been changed:

#cat /proc/net/bonding/bond0